Haley Alvarez-Lauto (COM ’25)
I grew up in the ultimate suburbia. If you walked 15 minutes in any direction, you had barely moved a neighborhood down. I grew up being driven around everywhere and then got my license and drove myself everywhere.
Growing up in suburban Florida, with a barely functioning public bus system and not even school buses in operation, I came to Boston heavily reliant on driving to get just about anywhere – and a complete novice when it came to navigating the public transportation system.
But, I quickly began to familiarize myself with the MBTA. I would now consider myself at least a little qualified to give you sometimes what I wish I had read before I moved to Boston. In this guide, I’ll talk about the basics of the MBTA and my best tips for navigation.
General Overview
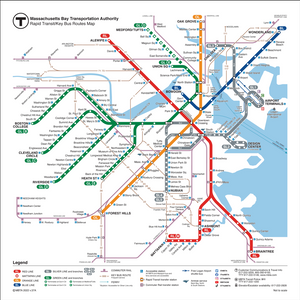
Boston has five main T lines, all color-coded for the section of the city it travels through: Blue, Green, Orange, Silver and Red Lines,. (Although, technically the Silver Line is made up of underground buses).
- The Blue Line will take you to the beaches, and Boston Logan International
- The Green Line (the one you should get the most familiar with since Boston University has six stops along the B Line of the Green Line.
- The Red Line which takes you to Harvard, MIT, and UMass Boston.
- The Orange Line which takes you to Chinatown, Assembly Row, and the Arnold Arboretum.
For the purpose of this guide, I will be focusing on the Green Line, as it is what BU students take the most frequently. However, it does get a little bit more complicated, as the Green Light is composed of 4 branches, notated by their end destinations or letters: Boston College (B), Cleveland Circle (C), Riverside (D), and
Heath Street (E).
The B line is the most important line to get familiar with as a Boston University student, as there are 6 stops along our mile stretch of campus. If you are ever trying to get into Downtown Boston, 9 times out of 10 you are taking the B train from campus. The fare for the subway is $2.40 one way, and $1.70 for buses.
If you are interested in learning more about the logistics of the MBTA, I encourage you to check out MBTA User Guides on their website.
https://www.mbta.com/schedules/subway
Now, onto my personal tips.
1. Get a CharlieCard One of the first things you should do when you start at Boston University is get a reusable CharlieCard, which you can load cash value or passes to pay for the T or busses. CharlieCards are available at fare vending machines in most subway stations, MBTA staff at most subway stations. They’re free other than the cash value you load on to them. It’s a lot more durable and convenient than a printable CharlieTicket. In a pinch, the T and busses accept cash as well.
2. My favorite apps for navigating the subway. Be sure to download an app that will help you navigate the subway. My favorites are ProximiT, Citymapper (which you can use in other cities), and also the Terrier Transit App
(which also has the BU bus schedule and estimated times). These apps allow you to enter your destination and get step by step directions. In addition, ProximiT uses GPS tracking to give an estimate of when the T or a bus will arrive at a station.
3. Keep in mind the hours of operation. Most bus and train service starts around 5 AM and ends around 1 AM. So if you’re planning on taking the T after a late night, remember to catch the last train before 1 AM or Uber back.
4. Kenmore is your best friend if you live in East Campus. I lived in Kilachand Hall my freshman year and absolutely loved being so close to Kenmore Station since 3 of the 4 green lines stop at Kenmore. If I was ever coming back from
Downtown Boston, I knew I could hope on any green line train (just not the E line!) and end up at Kenmore.
5. Get to know your vocabulary: inbound vs outbound
Inbound is always toward the 4 stations near Boston Common and outbound services travels away from those stations: Park Street, State Street, Government Center, Downtown Crossing.
6. Requesting a stop on the Green Line street level. You do not need to request your stop on the Red, Orange, or Blue Line. Or, on the Green Line when it’s underground – trains stop at every station. However when the Green Line trains are running at street level (basically the majority of our campus and into the Allston Brighton neighborhood), you will need to request a stop. Press
the yellow or black tape near the windows, or pull the gray cable near the ceiling of the train.
7. Hang on tight! The T can be vicious sometimes with sudden starts and stops, so make sure to either take a seat, grab a hold of a pole or hand hold, and hang on tight. Sometimes when the T gets super crowded, it’s impossible to hang on. So, make sure to stand with a wide stance, with one foot slightly in front of the other to maintain your balance. Trust me, nothing is more embarrassing
than falling on the MBTA.
Fellow Kilachand Student Smaran Ramidi and I rode a Green Line Train headed to Seaport last December!